By Jason Snyder
Sudoku tutorial part three: Final tips and tricks
In the previous two installments of this guide, we covered basic and intermediate methods for solving a sudoku puzzle. This third part is geared to those who are fairly comfortable with their basic sudoku skills and would like to speed up their solving or see some new methods not yet discovered. This is in no way a definitive round up of all the tricks out that can be employed. Rather, I fancy this as an overview of how I approach moderate and hard puzzles that may ultimately appear in The Daily Standard. The many, many other techniques I will not be covering in this guide can be researched online or possibly in other guides.
Since this is geared to those who are already comfortable with sudoku techniques, I will skip a review of previous suggestions.
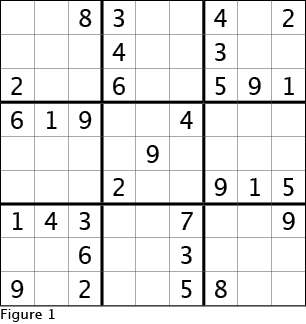
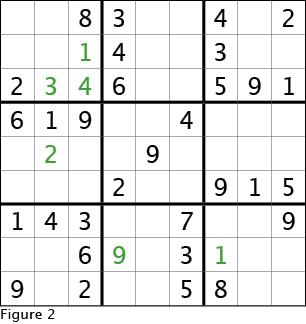
OK, I will jump right into this part's example sudoku, Figure 1. I first look for hidden singles in the 3x3 boxes to see how many quick and easy cells I can fill. This results in Figure 2. After getting the hidden singles in the 3x3 boxes, the next logical step, according to what I showed in the previous two parts of this guide, would be to fill all possibilities in the empty cells and look for naked singles and hidden singles in each row and column. But filling all possibilities in each cell for each number is something I'd rather not do until I must because it takes a long time, it is tedious and it is prone to errors.
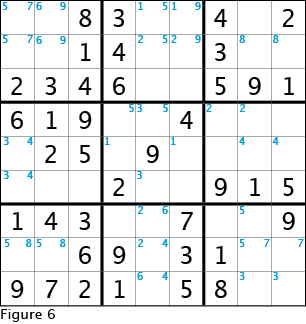
The strategy I employ at this point is to look at each 3x3 box and fill in a possible number only when that number can be placed in two cells. For instance, look at Figure 3, which is a detail of the bottom left corner from the example. The five and eight have not been placed in the bottom left 3x3 box. Looking back to Figure 2 we see that there is a five and eight in the bottom row in the other 3x3 boxes. Thus, neither the five nor the eight can be in the empty cell in the bottom left 3x3 box. So, the five and eight are left with only two possible cells each in the bottom left 3x3 box, and I mark them as Figure 3 shows. I do not use the fancy grid method of marking each number in a specific place because there is rarely a time when there are more than three numbers that need to be noted, and they all nicely fit in the top of the box. There are several things we will learn from the arrangement of numbers in Figure 3, but we will ponder them later.
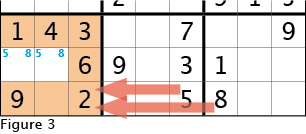
Figure 4 shows the entire sudoku grid filled out with my new method of filling in only the numbers that have two possible locations in a 3x3 box. Take a look at all the possibilities and be sure to understand why these and only these possibilities are marked.
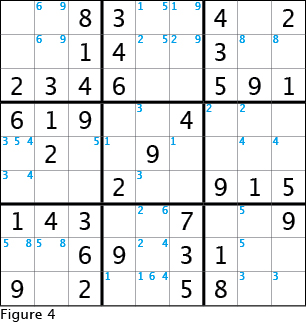
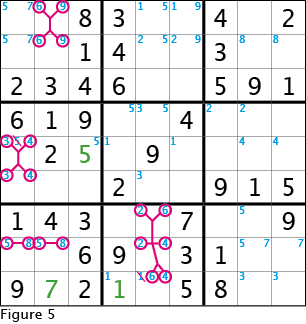
Lets get started with what we can learn from these possibilities. Take a look at either Figure 3 or Figure 4, we will be focused on the bottom left 3x3 box. Notice that of the three empty cells, two cells could contain an eight or a five. Now, because two cells have the same two potential numbers, one number must go in one cell and the other number must go in the other cell. Let this sink in briefly, then look at either figure and see how this concept applies here. Neither the eight nor the five can go in the bottom cell. If eight is placed in the top left cell, then the five must go in the top right cell, and if the five is placed in the top left cell then the eight must go in the top right cell. Hopefully you see this basic concept, but what does it tell us? If one number must go in one of the top cells and the other number must go in the other top cell (which number going where does not matter), then no other number can go in these two cells. What that tells us for the bottom left 3x3 box is that the only other number not already placed, the seven, must go in the bottom, empty cell because it cannot go anywhere else. See Figure 5 for this result.
Do be sure to understand this concept, as it will prove to be immensely helpful to you. The relationship between two cells with both possible positions of numbers goes by several names, but in this guide, I will term them "conjugate pairs." Where else in Figure 4 can conjugate pairs be applied? Look at the top left 3x3 box. The two possible locations for the six and the nine form a conjugate pair in the top two cells in the center column. This means that no other numbers can go in these cells, thus the two unplaced numbers besides six and nine, five and seven, must go in the two open cells in the left column of this 3x3 box. Notice that as Figure 5 shows this, the five and seven form their own conjugate pair.
Now look at another example where things can get more interesting. In Figure 4 look at the center left 3x3 box. The three and four form a conjugate pair, and a possible position of a five is intertwined with them. Because a three or a four must go in the upper cell, there is no room for the five there, and thus the five must go in the only remaining position as shown in Figure 5. Also note that in this 3x3 box the eight can be placed in the bottom center cell because of the conjugate pair and the eight in the right column above, but I want to cover a few more topics first.
Similar to the conjugate pair is the conjugate triple, an example of which is shown in the bottom center 3x3 box of Figure 4. The concept of the triple is the same as the double, except that three numbers have possible locations spread over three cells. The three numbers making up the conjugate triple must go in the three cells, and thus all other numbers can be excluded from those three cells. In our example, this means the one cannot go in the center column of the bottom center 3x3 box as illustrated in Figure 5. Conjugate triples are not an everyday thing, but this example happens to have one.
Also note that in Figure 5, I have added new two-cell possibilities which result from the new numbers I placed.
Figure 6 shows the starting point from which we will learn the next concept. I actually find Figure 6 rather hard to look at because there are so many cells that can be filled (the seven and eight in the center left 3x3 box, the seven and then the eight in the third row from the top, the one in the center 3x3 box, the eight in the bottom center 3x3 box), but I will resist the temptation in order to show examples of "pointing pairs."
A pointing pair results from both of a number's potential positions in a 3x3 box being in the same row or column. Knowing that a number must be in a certain row or column, based on the only two possible positions, allows potential positions in other 3x3 boxes to be eliminated in the same row or column.
Look at Figure 6 to see one that stands out clearly. See that the only two potential positions for five in the bottom left 3x3 box are in the middle row. Now, look over at the bottom right 3x3 box and see that one of the two potential positions for five is in the middle row. Thus, because we know the five will be in the middle row in the bottom left 3x3 box, the five cannot be in middle row in the bottom right 3x3 box. Figure 7 shows the left fives "pointing" to where the five cannot go on the right.
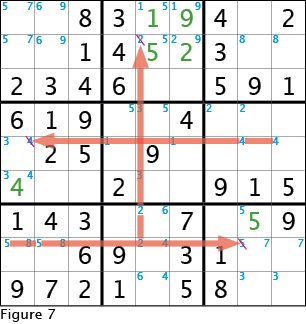
Similarly, Figure 7 shows the fours in the center right 3x3 box form a point pair that determines where the four in the center left 3x3 box must be placed. Looking vertically, the twos in bottom center 3x3 box form a pair that point out where one of the two positions marked for the two in the top center 3x3 box is not a viable. Placing the two in the center right cell results in a chain reaction because the nine is left with only one possible location. When the nine is placed the one must be placed in its only remaining cell and similarly for the five. And, although not shown in Figure 7, the fives in the top left 3x3 box indicate where the five must be placed in the bottom left 3x3 box.
The concept of pointing pairs can be extended in many ways. For instance, look back at Figure 4. The center 3x3 box does not have its six filled or possible locations for six marked. But then see the six in the top center 3x3 box precludes the placement of a six in the left column and the two potential sixes in the bottom center 3x3 box form a pointing pair so the six cannot be in the center column of the center 3x3 box. Thus we are left with the two unfilled cells in the left column of this 3x3 box where the six can be placed. But wait, there's more. Notice the six in the center left 3x3 box, while it does not affect the placement of the six in the center 3x3 box, does require that the six be in the center row of the center right 3x3 box (because the bottom row is already complete). So, although not forming a pointing pair, requiring the six to be in the center row of the center right 3x3 box, the six in the center 3x3 box cannot be in the center row, and we are left with only one cell, the lower right, to place the six.
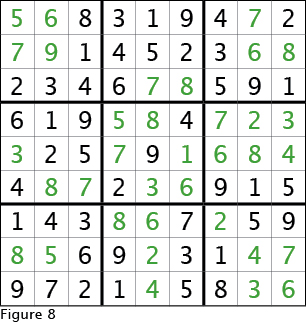
At this point, you have all the skills to solve this and most other easy, moderate and hard sudoku puzzles in The Daily Standard. The ending solution for the sudoku used in this edition of the guide is given in Figure 8.
I have by no means presented a complete list of approaches and techniques for solving sudoku puzzles, but as you continue to play them, you will undoubtedly develop your own techniques and discover your own tricks. If you need to know more tricks right now, there are many Web sites that give a rundown of the multitude of techniques, many with example puzzles.