Tuesday, October 29th, 2019
This Halloween, don't forget Spooky Makeup
By Leslie Gartrell

Photo by Dan Melograna/The Daily Standard
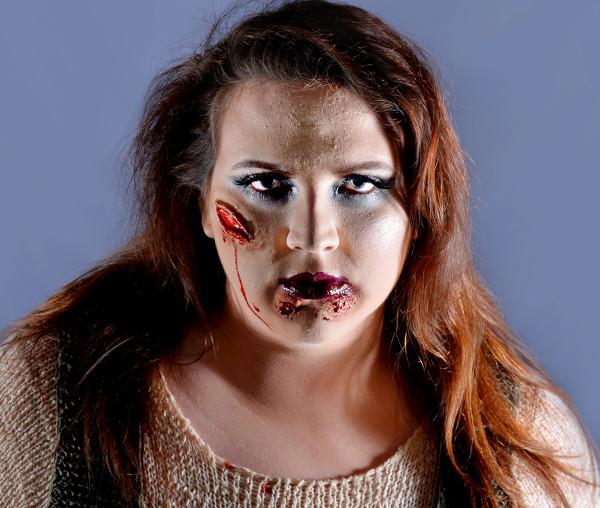
Daily Standard reporter-photographer Leslie Gartrell turned model-makeup artist to show how to create the perfect zombie, a popular look with boys and ghouls every Halloween.
While trick or treat has come and gone for many local kids, adults can still use some last-minute Halloween tricks to create spooky hair and makeup.
Hair and makeup artists gave their go-to hair and makeup techniques for fun and functional costumes.
Allison Harris, a Celina native who lives in Columbus, has worked with makeup artist Ve Neill, who received Academy Awards for her makeup work on "Beetlejuice," "Mrs. Doubtfire" and "Ed Wood."
Harris said Halloween is the one day of the year when people can venture outside their comfort zones and try something new and spooky.
"It's always fun to see what people come up with," she said.
The 20-year-old hairstylist said people shouldn't be afraid to get a little gory this Halloween. Using liquid latex or even a simple mixture of water, toilet paper and glue can add texture and depth to a look.
Harris said for a "crusty" look, people should use PVA glue to lock down bits of damp toilet paper and use a hair dryer to set. For a smoother look, eyelash glue will do the trick.
"Contouring is huge at Halloween, especially for spookier looks," Harris said. Using bronzer and black eyeshadow can give the wearer a hollowed-out look. Harris emphasized people need to blend, blend, blend when doing their makeup.
However, people need to properly prep their skin for a night of heavy makeup. Paige Koontz, 26, a hairstylist at Identity Salon, said it's important to moisturize and use a silicone-based primer to lock in the look.
"You have to have a good skin care base" not only to ensure the makeup looks good but also to make sure skin stays healthy post-Halloween, she said.
Harris agreed, saying after a night out it's important to take the makeup off right away. An oil-based cleanser is sure to get everything off, and people should further protect their skin by exfoliating and using toner.
While SPF can do wonders protecting skin, it's not good for photographs, Koontz said. Foundation with SPF can cause flashback, making the wearer looked washed out and ghoulish - and not in a good way.
Koontz said for those looking to complete their look by styling their hair, two-day hair or slightly dirty hair can be easier to handle. She suggested people wash their hair the day before so the hair can have more texture and hold the style better the next day.
Using a heat protectant on hair is important when straightening or curling hair, and a deep conditioning treatment can help soothe hair after teasing or backcombing, Koontz said.
Harris said makeup isn't only for women on Halloween. Men can get into the holiday spirit with a skeleton look that requires only black eyeshadow and a brush to blend it out.
For those looking to elevate their look, Harris suggested adding touches such as glitter and rhinestones. For example, she said, adding black-and-white glitter to a skeleton look can add dimension to avoid looking bland.
To lock the look into place, Koontz recommended setting spray to help makeup stay fresh throughout the evening. Harris said using a hairspray low in alcohol content can be a last-ditch effort for getting glitter to stick for the night.
A Halloween costume that requires no pieces other than hair and makeup work could be a zombie. Since zombies have no typical outfit, the zombie can don whatever clothes they please as long as they're not afraid to get a little gory. I set out to create a glam zombie look and put Harris's and Koontz's tips to the test.
Step 1
Start off with clean, moisturized skin before applying makeup. Apply a primer, preferably silicone based, on areas such as the forehead, chin, nose and under the eyes with a brush, makeup sponge or fingertips.
Step 2
Using a damp makeup sponge (or applicator of choice), apply foundation that contains no SPF. Make sure to cover not only the face, but also the neck and ears for an even blend. Apply a concealer that's slightly lighter than the wearer's skin tone to the bridge of the nose, under the eyes, center of the forehead, chin and above the upper lip. Blend with applicator of choice.
Contour the face with bronzer that's no more than two shades darker than the wearer's skin tone on the jawline, into the hollow of the cheeks, along either side of the nose and along the top of the forehead and temples. Blend, blend and then blend some more. Fill out brows with product of choice and blend with a brush. Add blush to the top of the cheekbones. Apply a shimmery highlighter to the top of the cheekbones, bridge of the nose, above the upper lip and under the tail end of the eyebrows.
Step 3
Pack on a layer of translucent powder under the eyes to catch loose eyeshadow. Prime the eyes with an eyeshadow primer or concealer. Using an eyeshadow brush or even fingertips, pack black eyeshadow onto the entirety of the lid. Blend with another clean brush to avoid harsh lines. It's OK if it looks a little messy; zombies aren't very particular when it comes to makeup. Blend out toward the temple for a dramatic "winged" look. Pack on glitter to the inner corner of the eyes using another clean brush or fingertips. Brush away translucent powder under the eyes and blend black eyeshadow under the eye until it connects to the eyeshadow from the upper lid. Apply fake eyelashes for added drama.
Step 4
Apply a dark lipstick of choice. I used a deep, matte purple liquid lipstick. Using a paint brush or sponge, apply a thin layer of liquid latex to the cheekbone and below the lips. Wait for the latex to dry or use a hair dryer to speed up the process. Apply a second layer and allow it to dry. Apply a thin, fresh layer to attach bits of toilet paper. Roll out thin pieces of toilet paper and attach to the cheek to resemble a gash. Apply crumpled bits below the lips for a "crusty" look. Apply another layer of liquid latex and let it dry.
Step 5
Use red, orange and yellow eyeshadow around the "wounds" to make the skin look irritated. Alternatively, use pink, purple, blue and yellow eyeshadow to make the skin look bruised. Using a clean brush, apply fake blood to the wounds. Dab onto wounds under the lips and brush the inside of the cheek wound. Drip fake blood into the wounds, making sure to avoid clothing to prevent stains. Using a brush or a comb, tease the hair to create a messy look.

Photo by Dan Melograna/The Daily Standard
Daily Standard reporter-photographer Leslie Gartrell turned model-makeup artist to show how to create the perfect zombie, a popular look with boys and ghouls every Halloween.
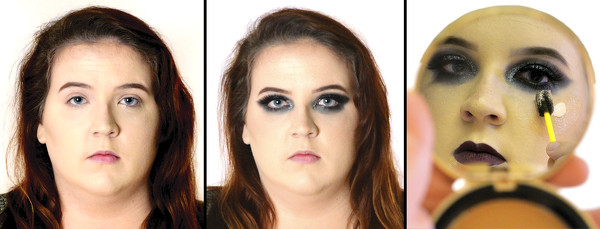
1) Before applying makeup, clean and moisturize the skin. Apply
a silicone-based primer.
2) Apply foundation. Blend black eyeshadow onto the eyelid.
It's OK if it's a little messy.
3) Add liquid latex for the wound. Let dry. Add another layer, then toilet paper. Later, paint wound.


